
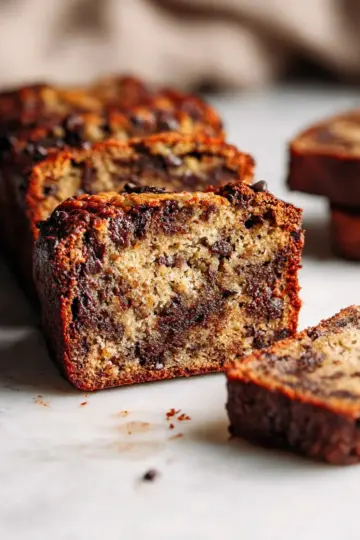
Introduction to No-Bake Chocolate Oreo Cheesecake
If you’re looking for a dessert that’s not just delicious but also incredibly easy to whip up, then no-bake chocolate Oreo cheesecake might just become your new favorite! This delightful dessert combines rich chocolate and creamy cheesecake with the irresistible crunch of Oreo cookies, all without the hassle of turning on the oven. It’s perfect for those warm summer days when all you want is something sweet, cool, and satisfying.
Why Choose a No-Bake Cheesecake?
No-bake cheesecakes are fantastic for several reasons. First and foremost, they save your kitchen from heating up—ideal for busy young professionals who want to enjoy dessert without the extra heat and fuss. Plus, they require minimal ingredients and time. Simply mix, pour, and let the refrigerator do the work!
Did you know that no-bake cheesecakes can often have a lighter texture than their baked counterparts? This airy feel makes them incredibly indulgent and enjoyable. It's the perfect treat for gatherings, birthdays, or just a cozy night in. For those looking for a quick recipe for a sweet fix, this no-bake chocolate Oreo cheesecake will not disappoint!
For more delicious cheesecake ideas, check out Cheesecake.com for expert tips and variations!

Ingredients for No-Bake Chocolate Oreo Cheesecake
Creating this delightful no-bake chocolate Oreo cheesecake starts with three simple components—each adding its unique charm to the dessert.
For the crust
- 1 package (14.3 oz.) Oreos: The classic choice for an irresistible crumbly base.
- ½ cup (113g) unsalted butter, melted: This helps bind the cookie crumbs together for a firm yet delicious crust.
For the cheesecake filling
- 4 ounces (113g) dark chocolate bar: Melted to give that rich chocolate flavor.
- 1 ¼ cups (295ml) heavy whipping cream: For airy, fluffy texture.
- ½ cup (65g) powdered sugar: Sweetness addition that balances the flavor.
- 16 ounces (452g) full-fat cream cheese, at room temperature: A must for that creamy, rich filling.
- ½ cup (95g) granulated sugar: Enhances sweetness.
- 2 tablespoons (10g) cocoa powder: A hint of cocoa elevates the chocolate taste.
- 2 teaspoons (10ml) pure vanilla extract: For added depth of flavor.
- 20 Oreos, crushed: Because more Oreos equal more fun!
For the topping
- 1 cup (236ml) heavy whipping cream: To make an extravagant whipped cream layer.
- ½ cup (65g) powdered sugar: Sweetening the topping just right.
- Additional Oreos: For garnishing—because who doesn’t love a good cookie on top?
- Hot fudge sauce (optional): Drizzle this for an extra indulgent touch!
Dive into these ingredients, and you’ll see how easy it is to whip up this no-bake chocolate Oreo cheesecake. For tips on obtaining the perfect whipped cream, check out King Arthur Baking's guide. And remember, having quality ingredients makes all the difference!
Step-by-Step Preparation of No-Bake Chocolate Oreo Cheesecake
Creating a delicious no-bake chocolate Oreo cheesecake is a delightful journey that results in a heavenly dessert, perfect for any occasion! Let’s dive into the straightforward steps that will lead you to a rich and creamy treat everyone will rave about.
Prepare your crust
To kick things off, let’s make that irresistible Oreo crust. First, grab a 9-inch springform pan and give it a light grease with cooking spray. This helps the cheesecake come out smoothly after chilling. Next, take one package of Oreos—yes, that’s 14.3 ounces—and grind them into fine crumbs using a food processor. If you don’t have one, a strong zip-top bag and a rolling pin will work just fine.
Once you have your crumbs, pour in ½ cup of melted unsalted butter and stir until they’re well-coated. Press this crumb mixture into the bottom and up the sides of your prepared pan, ensuring it's firm and even. Pop it into the refrigerator while you whip up the filling, allowing it to set.
Make the cheesecake filling
Next comes the indulgent filling! Start by melting 4 ounces of dark chocolate in a microwave-safe bowl, stirring every 30 seconds until completely smooth. In a separate chilled bowl, whip 1 ¼ cups of heavy cream until soft peaks form, then add ½ cup of powdered sugar and whip until stiff peaks form.
In another mixing bowl, beat 16 ounces of room-temperature cream cheese until smooth, then add ½ cup of granulated sugar, 2 tablespoons of cocoa powder, and 2 teaspoons of pure vanilla extract. Mix until combined, then fold in your melted chocolate and finally the whipped cream, making sure it’s smooth and luscious. Gently stir in 20 crushed Oreos for that extra cookie goodness!
Assemble the cheesecake
With your crust set and the decadent filling ready, pour the cheesecake mixture into your chilled crust. Smooth it out evenly and cover the pan with plastic wrap. This is where the magic happens, as you then refrigerate the cheesecake for at least 3-4 hours or overnight if you can resist!
Chill to perfection
Chilling is key to a fabulous cheesecake! The longer it sits, the better it sets, allowing all those flavors to meld together beautifully. During this time, you can daydream about how delicious your no-bake chocolate Oreo cheesecake will be!
Add the finishing touches
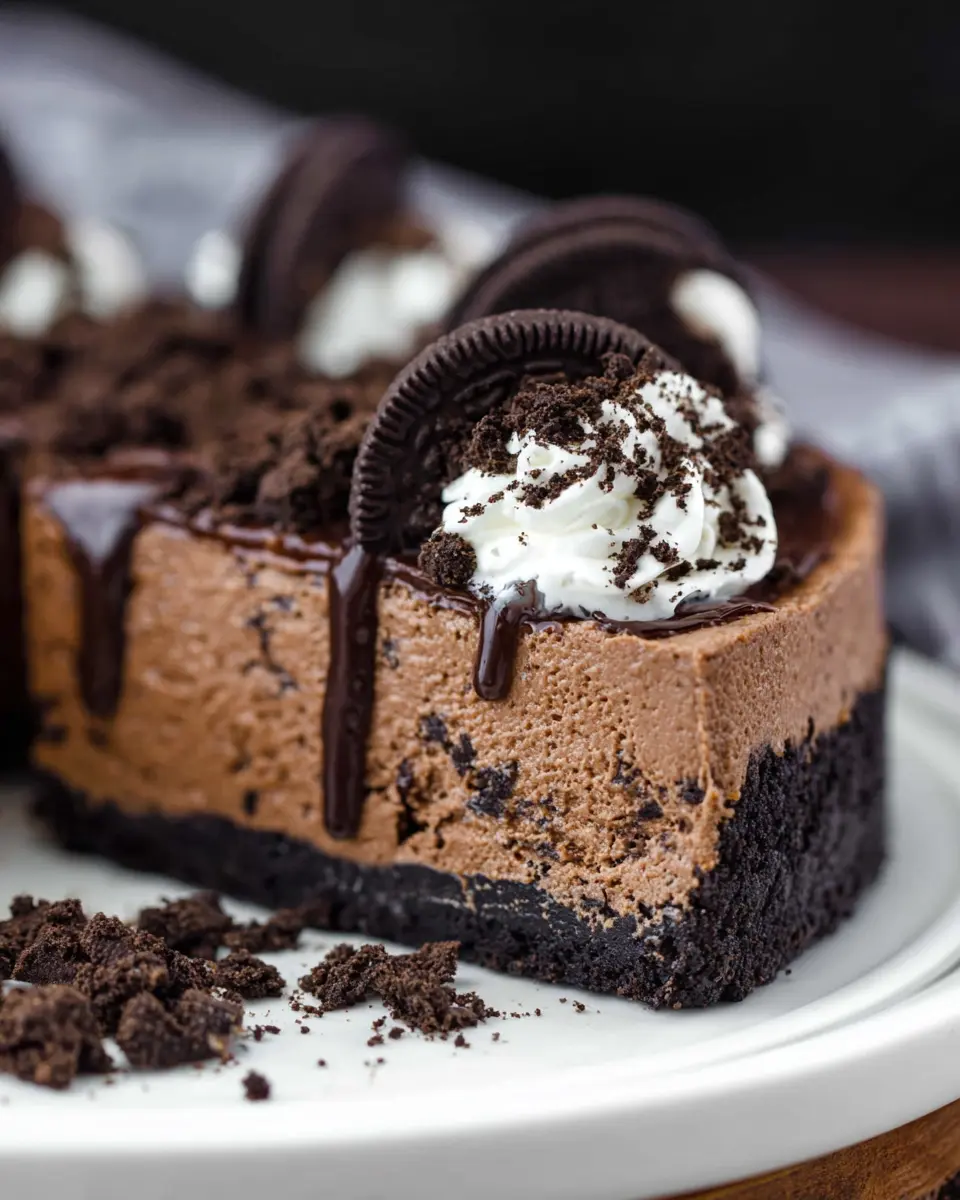
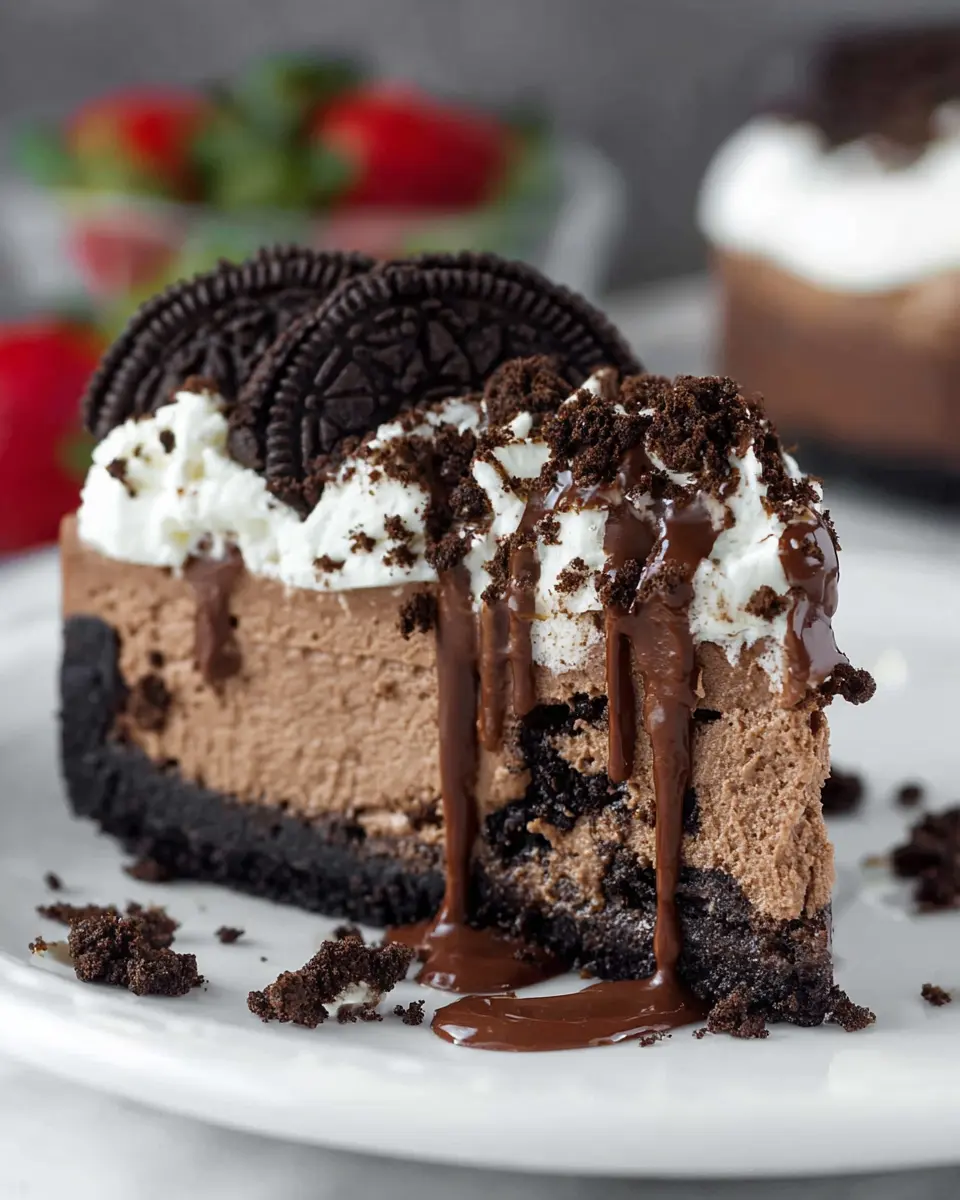
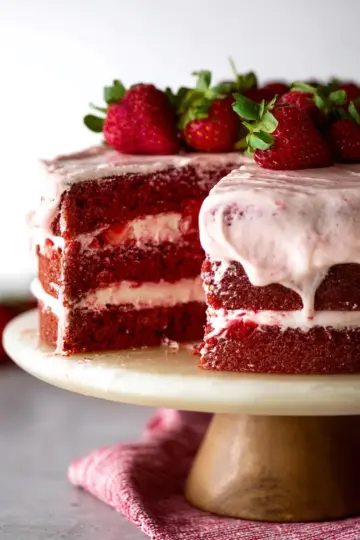
Once chilled, it’s time to create the topping that brings everything together. Prepare another batch of whipped cream using 1 cup of heavy cream and ½ cup of powdered sugar, piping it around the edges for that elegant look. For the pièce de résistance, garnish with crushed Oreos and, if you're feeling extra indulgent, drizzle some hot fudge sauce on top. Cut it into slices, and watch your friends and family fall in love with this creamy masterpiece!
Now that you have the detailed steps, go ahead and treat yourself—the no-bake chocolate Oreo cheesecake awaits!
Variations of No-Bake Chocolate Oreo Cheesecake
Mint Chocolate Oreo Cheesecake
If you love the refreshing taste of mint, try adding some peppermint extract to your no-bake chocolate Oreo cheesecake. Simply mix in 1 teaspoon of mint extract with your cream cheese filling for a delightful twist. Top with crushed mint Oreos or a drizzle of chocolate sauce for a dessert that’s as beautiful as it is delicious!
Peanut Butter Oreo Cheesecake
For a decadent twist, consider a peanut butter variation! Blend ½ cup of creamy peanut butter into your cheesecake filling, enhancing the rich chocolate flavor. You can even top this version with mini peanut butter cups for an extra indulgence. This no-bake chocolate Oreo cheesecake will surely satisfy any sweet cravings!
Explore more ideas and variations here.
Cooking Tips and Notes for No-Bake Chocolate Oreo Cheesecake
Achieving the Perfect Texture
To ensure your no-bake chocolate Oreo cheesecake is creamy and smooth, take your time when beating the cream cheese and sugar until fully blended. For the whipped cream, chilling your mixing bowl ahead of time helps create fluffy peaks. Remember to gently fold the whipped cream into the chocolate mixture—this keeps it airy, giving you that delightful texture!
Storing Your Cheesecake
Once you've indulged in this decadent dessert, store any leftovers in the refrigerator. Wrap the cheesecake tightly in plastic wrap to maintain its freshness. It can last for up to five days, but let’s be honest—you'll probably want to finish it sooner! If you want other tips on cheesecake storage, check out this helpful guide.
Serving Suggestions for No-Bake Chocolate Oreo Cheesecake
Ideal Accompaniments
To elevate your experience with no-bake chocolate Oreo cheesecake, consider pairing it with fresh berries like raspberries or strawberries. Their tartness perfectly balances the rich, creamy texture of the cheesecake. For an indulgent twist, drizzle some warm hot fudge or caramel sauce on top, adding layers of flavor. A dollop of whipped cream is also a lovely touch—try flavored whipped cream for an extra fun kick!
Presentation Tips
Presentation is key to impressing your guests. Serve your no-bake chocolate Oreo cheesecake on a decorative cake stand for a charming display. Garnish with crushed Oreos and a sprinkle of cocoa powder for a polished look. You can even add some mint leaves for color contrast. For a personal touch, share a fun story about your cheesecake-making adventure as you serve—your friends will love it!
For more dessert ideas, check out this source for inspiration.
Time Breakdown for No-Bake Chocolate Oreo Cheesecake
Preparation Time
Get started on this delightful treat in just 30 minutes! This is the perfect time to indulge your inner chef and enjoy the process of crafting this decadent dessert.
Chill Time
Once you've prepped your no-bake chocolate Oreo cheesecake, allow it to chill in the refrigerator for at least 4 hours. This step is crucial for setting up that creamy texture.
Total Time
In just 4.5 hours from start to finish, you’ll have a stunning cheesecake ready to impress friends and family! Plan ahead so you can make the most of your dessert experience.
For more tips on perfecting your cheesecake, check out this resource on cheesecake techniques.
Nutritional Facts for No-Bake Chocolate Oreo Cheesecake
Calories per slice
Each slice of this no-bake chocolate Oreo cheesecake packs approximately 1,086 calories. It's a decadent treat best enjoyed in moderation, especially when you're craving something rich and sweet.
Sugar content
A slice contains about 79.5 grams of sugar, largely from the Oreos and cream cheese. While sweet, you'll want to savor this dessert to truly appreciate its flavors.
Fat content
This cheesecake has a significant 65.3 grams of fat per slice, primarily from the cream cheese and heavy whipping cream. It’s indulgent, so consider sharing or saving leftovers for a special occasion!
For more insights into dessert nutrition, you can check out the USDA FoodData Central for detailed breakdowns. Enjoy your sweet slice responsibly!
FAQs about No-Bake Chocolate Oreo Cheesecake
Can I use reduced-fat cream cheese?
Absolutely! While full-fat cream cheese gives the creamiest texture, using reduced-fat cream cheese can be a healthier alternative without compromising too much on flavor. Just keep in mind that it may slightly alter the richness of your no-bake chocolate Oreo cheesecake.
How long can I store leftovers?
If you have any leftovers (which might be a challenge!), you can store your cheesecake in the refrigerator. Tightly wrap the pan with plastic wrap or transfer slices to an airtight container. It should last for about 3 to 5 days. For optimal taste, try to enjoy it within the first couple of days!
What can I substitute for Oreos?
No Oreos? No problem! You can swap them out for other chocolate sandwich cookies or even graham crackers for a different twist. If you’re feeling adventurous, homemade chocolate cookies can elevate the flavors even more! Get creative, and don’t hesitate to experiment with textures and flavors.
For more tips, check out this article on cheesecake variations and techniques!
Conclusion on No-Bake Chocolate Oreo Cheesecake
In conclusion, this no-bake chocolate Oreo cheesecake is an indulgent treat that's perfect for any occasion. With its rich flavors and creamy texture, it’s bound to impress your friends and family. Follow the recipe closely, and you’ll create a dessert worth sharing—or keeping all to yourself!

No-Bake Chocolate Oreo Cheesecake
Equipment
- 9-inch springform pan
- food processor
- electric mixer
- mixing bowl
- whisk attachment
Ingredients
Crust
- 1 package Oreos 14.3 oz. (405g)
- ½ cup unsalted butter melted
Cheesecake Filling
- 4 ounces dark chocolate bar
- 1 ¼ cups heavy whipping cream
- ½ cup powdered sugar
- 16 ounces full-fat cream cheese at room temperature
- ½ cup granulated sugar
- 2 tablespoons cocoa powder
- 2 teaspoons pure vanilla extract
- 20 Oreos crushed
Topping
- 1 cup heavy whipping cream
- ½ cup powdered sugar
- Additional Oreos for garnish
- Hot fudge sauce for garnish (optional)
Instructions
Crust
- Prepare a 9-inch springform pan by lightly greasing the edges of the pan with cooking spray, and then wiping gently with a paper towel. Line the bottom of the pan with parchment paper.
- Grind the Oreos into a fine crumb using a food processor or blender. Pour the melted butter over the cookie crumbs and stir until the crumbs are well coated.
- Pour the crumbs into your springform pan and press firmly into the bottom and up on the sides to create a thick crust. Refrigerate the crust while you are preparing the filling.
Cheesecake Filling
- In a microwave-safe bowl, microwave the chocolate at 50% power in 30-second increments, stirring each time until the chocolate is melted. Stir until completely smooth.
- Prepare the whipped cream. Place the mixing bowl and whisk attachment in the freezer for 5 to 10 minutes to chill. Pour 1 ¼ cups heavy whipping cream into the chilled bowl and use an electric mixer to beat the heavy cream on medium-high speed until soft peaks form. Add the powdered sugar and continue beating on high speed until stiff peaks form. Set the whipped cream aside.
- Beat the cream cheese until it’s completely smooth, scraping down the sides of the bowl as needed. Next add the granulated sugar, cocoa powder and vanilla extract and continue beating until smooth.
- Next add the melted chocolate, beating until it’s completely mixed into the cream cheese.
- Finally, slowly fold in the whipped cream until it’s completely smooth. Then stir in the crushed Oreos. Pour the filling into the prepared crust, spreading evenly. Refrigerate for 3-4 hours minimum.
Topping
- Prepare another batch of whipped cream by placing your bowl in the freezer for 5-10 minutes. Beat the heavy cream in the chilled bowl until soft peaks form. Add the powdered sugar and continue beating on high speed until stiff peaks form.
- Pipe the borders of the pie with whipped cream using a large open round tip. Garnish with more crushed Oreos and hot fudge.
Leave a Reply